Are you looking for the best and easy ways to resize an image without losing image quality? Gimp can be your best tool for it. Yes, GIMP is free and open source Image manipulation tool helps you to edit your images with all amazing features. GIMP is compatible with Windows, macOS, GNU/Linux, BCD, Solaris operating systems. You can use GIMP for image retouching and editing, Enlarging and Reducing image size, Free-form drawing and for changing image formats. In this article I will show you how you can easily resize your images with the help of GIMP tool without compromising the quality of your images. Here we go:
Open GIMP and Select Image
As we are running GIMP on Ubuntu operating system, most of the instructions are recorded accordingly. Here either you open GIMP from command prompt or click on icon. Once the GIMP is open, click on FILE and select the image as per below instructions.
Step:1 For opening your image. FILE > OPEN > Select the image (Below is the screenshot of DigiFloor which we are using for demo purpose)
Step: 2 Go to Image > Scale image
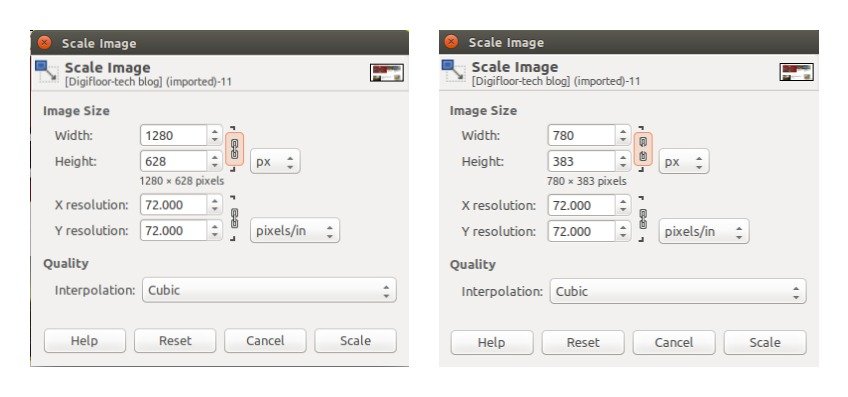
Step:3 Scale image dialog box will pop up on screen. Currently Image size is 1024 x 502 pixels. To check the image size in pixel, inch or % use drop down beside the values.
Step:4 Now either enter the Width or Height you want to choose for resized version of your image. Please make sure that the larger image size may harm the image quality hence, we strongly recommend you using small image dimension as compare to its original one.
Step:5 Now save the image file through: File> Exported as> enter file name and choose extension format > push Export button
(To choose image format you can see drop down at just above the export button in Export image dialog box)
You are done!
I understand there are few limitations of this tool but when it comes to opensource programs to manage images, GIMP is the best among the available tools.


