
This article will teach you How to authorize your computer on iTunes that will also help you to fix “Can’t authorize my computer on iTunes” error. This article is written by testing and authorizing Mac or personal computer with iTunes manually and was working completely fine while writing this article.
Before I explain an authorization part, let me tell you why it is require to authorize your computer on iTunes?
Apple’s most of the products including iTunes store revolved around digital rights management (DRM) which ensures that no content is pirated or used by people other than the individual who paid for it. The DRM setup requires users to authorize computers to their iTunes store to be able to uses the content the individual bought. Every time you choose to access of content/applications or music files downloaded from iTunes, you will have to sign in to your iTunes account. If you haven’t authorized your system already, you will receive an alert message asking you for a valid sign-in.
Authorizing iTunes on your computer or a Mac is necessary to access any type of content, ranging from music to TV shows, iOS applications, eBooks etc downloaded via iTunes store associated with your account. Now every iTunes account allows you to connect a maximum of 5 computers/devices. If you already authorized 5 PCs or Mac, you will have to de-authorize them to authorize additional device.
If you are looking to authorize your first iTunes purchase on your computer system, here’s how to go about it.
Authorizing a Mac Computer
Before you start authorizing process first time, download and install latest version of iTunes from official Apple website. Once the installation process is complete in your Mac system, just open the “Authorize this computer” dialogue with your Apple user ID and password. If you don’t know where to get the dialogue, just try to play any content through the DRM and you will be taken through the process.
Alternatively, this option can be accessed on iTunes > Store > Authorize this Computer.
On clicking authorize after providing your user ID and password, the iTunes store will sync your system with your downloads. The authorization might take up to a few minutes depending upon the number of hamsters powering the iTunes Store at that instance. In case you come across a situation where iTunes has locked up completely, Ctrl-click the dock icon to initiate a Force Quit and try signing in again.
On successful authorization of your computer, you will be able to see a representative dialogue box along with all the other systems/devices that are linked to your iTunes account. A single computer may also be used to authorize multiple iTunes accounts. This is relevant if you are sharing system with other members in your family.
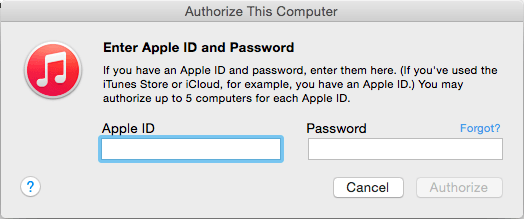
Step 1: Go to iTunes > Store > Authorize this Computer
 Step 2: Enter Apple ID and Password to Authorize iTunes
 Step 3: iTunes Authorization Successful
 If you have already authorized the computer using same iTunes account, you will get below popup while authorizing the Mac.

Authorizing Other Computer on iTunes
If you are using other personal computer and want to authorize iTunes with your computer, kindly follow below simple steps:
- Add files you would want to play on the PC option for this include:
- Home sharing
- iPod copy programs
- External hard drive
- Transferring purchases from iPhone/iPod
- Once the file is in the PC, drag it into the iTunes library and double click to play. If your PC isn’t already authorized, you will see an alarm dialogue asking for the same.
- Log into your iTunes account using the Apple ID and password used to buy/download the file.
- All you need is providing the correct login information for the authorization process to initiate.
Few useful tips:
- All music available at the DRM free iTunes Plus library removes the necessity of authorization to play songs.
- Even if you don’t have a file to play, you can head on to the Store Menu to authorize your system ahead of time.
- iTunes allows you to authorize a maximum of 5 computers with a single account. Consequently, you might want to free up the activation limit by de-authorizing some systems. This is also relevant if you are discarding / selling off your device that has been authorized with your iTunes account.
- You will need the exact user ID that has been used to download/buy a file to authorize your computer and play the same.
Deauthorizing a Computer
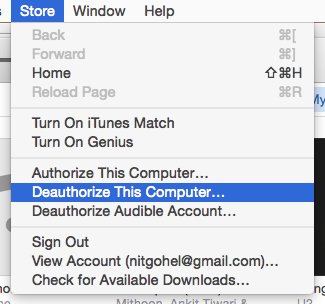 De-authorizing a computer is recommended when you stopped using a computer or selling them to someone else. Simply go to Store Menu and deauthorize this Computer option which require to login with the credential used while authorizing the computer with iTunes. Here is the screenshot:

You may also go to your Apple Account to Deauthorize all devices linked to your account. However, this option can be used just a single time in a year.
If you are still facing any issues while authorizing an iTunes with your Mac or Personal computer, do write here with the error you are facing while authorizing your computer with iTunes and we will get back to you with best possible solution to it.